Not so Good Vibrations

Disclaimer: Links on this page pointing to Amazon, eBay and other sites may include affiliate code. If you click them and make a purchase, we may earn a small commission.

OP
OP
whtbronco

whtbronco

Full Access Members
Joined
Nov 13, 2021
Posts
647
Reaction score
283
Location
Winchester, VA
I'm gonna wrap this thread up. All the vibration causes had been identified and resolved except the tires. For now the tires have not been replaced. My wife and I disagree on replacing them, she's says it feels fine up to 85mph. No reason to track the A/C compressor in this thread. It's finally over. Thanks to all that helped me along the way.

I have decided to sell the transfer case I picked up at the salvage yard and rebuilt. For sale thread: https://www.expeditionforum.com/threads/bw4416-rebuilt-transfer-case-for-sale.56609/
 
OP
OP
whtbronco

whtbronco

Full Access Members
Joined
Nov 13, 2021
Posts
647
Reaction score
283
Location
Winchester, VA
Well I thought I was gonna wrap this thread up, but I have another related issue. It's not vibration thank goodness, but it was covered starting on page 3 of this thread so I figured I'd update it.

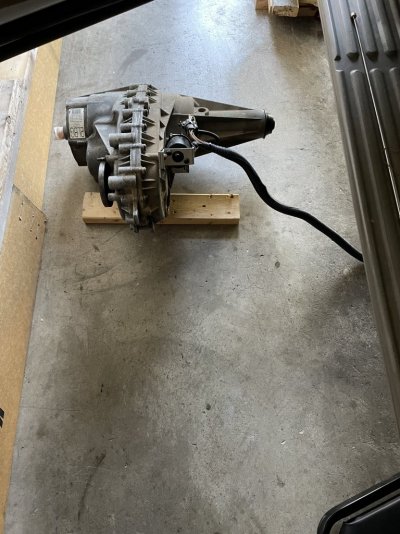
Sunday I put the front driveshaft back in and found the clutch or coil in the transfer case was locked up. Transfer case shifts into A4WD, 4HI and 4LO. It was very difficult to get out of 4WD once engaged. Took 20-30' of both forward and backward for IWE's disengage due to binding, I think the electric clutch or coil is locked up. This was a problem before that I thought the new OEM shift motor resolved, clearly it did not. Though it resolved numerous of other module and communication issues. With the IWE's unlocked it's still very smooth up to 80mph with the front driveshaft turning which is good due to the vibration hunt I just went on.

I took it for a 12mi trip Sunday afternoon. Once home I found the front driveshaft unlocked. It turned with an appropriate amount of resistance for the chain, diff and cv axles. I hooked up my scanner and found things seem to respond appropriately key on engine off. The front driveshaft rotated in 2WD and A4WD, it was locked in 4HI and 4LO as expected and it returned to unlocked when back to 2WD.

With the engine running the front driveshaft was unlocked in 2WD. Switched into A4WD and the IWE's locked but I could still rotate the driveshaft until the play taking up the play. Switched into 4HI and the driveshaft locked to the rear as expected. It would not unlock after this. I tried shifting multiple times, rolling it back and forth in neutral and drive. Rolled to the end of the driveway, no change. Drove a bit further at very low speed engaging/disengaging 4HI. Each time it was difficult to get the IWE's to unlock if I had turned at all inducing some binding.

Monday after the 75mi trip to work the front driveshaft was locked in. Tuesday after the same trip it was unlocked when I got home. The first time I shifted to A4WD the clutch locked in. I find it amazing that the coil engaging is utterly silent. I would think the clutches or the clutch plate would move just a tiny bit and could be heard. Did some of the pinpoint tests, that don't require accessing the 4WD module. Everything seemed okay, 2 of the tests(B16/B17) said replace the electric clutch. Of course I skipped some tests and will try to get through those this weekend. I have another used transfer case, but man I hate to remove the transfer case again to swap the clutch pack and coil.


Engine off
Switch positions verified via scanner, dash lights agree, as does the sound of the shift motor and shift fork movement.
Coil shows 1.96% in A4WD.
Coil shows 0 in 2WD and 4WD
I get voltage to the coil pin in A4WD, 4HI and 4LO.
Resistance on the spare coil is 3ohms, the one in the truck is 4ohms.

These 2 modules have readings that alternate for some reason. I found no other modules doing this.
4WD Module:
Clutch PWM status: Off-N/A
4WD Switch status: Selected setting-N/A(alternated the most by far)
Throttle position status: 16-N/A (engine off)

Vehicle Dynamics Module:
Air suspension at accurate trim: Out Correction-N/A
UBP Communication Bus Fault: No error-N/A


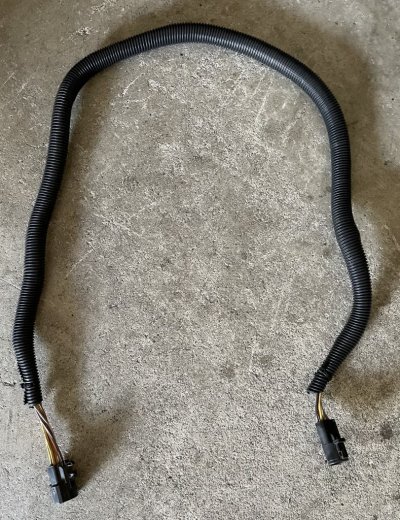
The one thing I have yet to find is how to actually directly test the coil. It gets voltage from the 4WD module, in fact at 100% Pulse Width Modulation set by my scanner it gets 12.26v. So can I just take a battery and connect positive to the coil wire and ground to the mounting bolts on the spare transfer case?

Maybe something in the clutch pack is getting stuck since if the clutch is disengaged after a ride it will engage as expected and then won't disengage.
 
OP
OP
whtbronco

whtbronco

Full Access Members
Joined
Nov 13, 2021
Posts
647
Reaction score
283
Location
Winchester, VA
I have found no one and no information on how to directly test the coil except for resistance. Resistance of 3-5ohms is reportedly good. The spare is 3ohms, mine is 4ohms. When I turn up the PWM to the coil in the truck with my stethoscope today I could hear it buzzing progressively louder from 10% to 100%.

When I connected a battery directly to the spare coil I clearly heard a light thump again only using my stethoscope, repeated several times. When I connected the same battery to the coil in the truck I heard a much more faint and higher pitch noise, maybe tink accurately describes it. Is that audible difference due to the trans fluid the fact that it's mounted or something else. I dunno.

Basically I am not convinced of the issue from that test.

I keep thinking it could certainly be something that's getting stuck. It seems like when the clutch has released I can get it to engage first try, but I can't get it to release reliably. Of course since I was looking for an issue while rebuilding the transfer case I disassembled the clutch pack entirely. I was confident I had it back together properly and everything looked very good, but maybe I messed up or something moved. Here's what I keep thinking about so I will be pulling the transfer case and checking it out.

19. CAUTION: When removing the clutch pack assembly, do not separate the clutch pack assembly. Keep tension on the clutch pack upon removal. Set the clutch pack assembly on the bench in the same position as located in the transfer case. The thrust washer in the lower clutch pack uses tabs to hold it in place. If the thrust washer is not in place, a transfer case clearance problem can occur.
 
Last edited:

kep5niner

Full Access Members
Joined
May 6, 2023
Posts
140
Reaction score
109
Location
MO
OP good luck on your new quest! Wish I had something to offer, but unfortunately I don’t. I do, and I’m certain the eternity of the internet, appreciates you capturing your thorough troubleshooting and documenting it. I’m sure others in the future will be helped by your information.
 
OP
OP
whtbronco

whtbronco

Full Access Members
Joined
Nov 13, 2021
Posts
647
Reaction score
283
Location
Winchester, VA
Thanks, I hope maybe someone can get something out my ramblings.

I was able to review this thread and found I had noted the same clutch issue before the transfer case rebuild, and that the salvage yard transfer case did not. I have gone back through this thread a few times now actually.

I also think I came up with an idea to test this before remounting the transfer case. I am going to take a connector from an old shift motor and pick up the truck side of the connector. With these I can make up an extension and plug the transfer case in while it sits on the floor to verify the clutch engages and releases properly. I might have to run a ground from a coil stud to the truck we'll see.
 
OP
OP
whtbronco

whtbronco

Full Access Members
Joined
Nov 13, 2021
Posts
647
Reaction score
283
Location
Winchester, VA
LOL, that was pretty good kep5niner.

I found both sides of the shift motor connector in my attic and made up the extension today. It actually took 2 shift motor connector leads since I needed to take 1 wire to fill in the missing coil wire in the extension. I added ~3.5' of wire between the connectors and ended up with 4' 5". I had a perfect piece of 3/4" wire loom so I put that on it too just to keep all 8 wires neat and snag free.

Then like a little kid at Christmas I had to try it out. I grabbed the hand truck and moved the spare transfer case beside the truck. Moved the shift motor from the truck to the spare and proceeded to test. It worked like a charm. The spare shifted through each setting as expected. The clutch held the output shafts together in 4HI and 4LO, as expected. I could pretty easily hold the input shaft still while turning the front output shaft flange in 2WD and with ever so slightly increased resistance in A4WD. I also noticed that there was no buzzing from the coil when I bumped the coil PWM up from 0-100%. The coil in the truck buzzes, well none at 0% PWM, but at 10-100% it gets progressively louder and 100-0% progressively subsides. The buzzing is only audible with a stethoscope. So I am 99% sure it's the coil and only the coil, but I now know I can test the transfer case before reinstall which makes me feel much more at ease.

One thing to note is that the transfer case sitting beside the truck and being turned generated multiple error codes, not really a surprise since all these modules like to talk to each other.
ABS module
U1900 CAN Communication Bus Error - Reception Error (this one makes sense based on the test)

HEC module
U1041 Invalid Vehicle Speed Data (this one makes sense based on the test)
U1262 SCP Data Link Fault (pretty common for me and I have not tried to figure it out yet)

PCM
B1600 No PATS (this one is intriguing, but it started after the test, this is the 2nd time I've seen it, 1st time was 10/06/22)
 

Attachments

  • Transfer case extension wire in use.jpg
    Transfer case extension wire in use.jpg
    193.1 KB · Views: 1
  • Transfer case extension wire.jpg
    Transfer case extension wire.jpg
    346.6 KB · Views: 1
OP
OP
whtbronco

whtbronco

Full Access Members
Joined
Nov 13, 2021
Posts
647
Reaction score
283
Location
Winchester, VA
I realized last night that with the spare transfer case connected it was the first time in a couple years I have scanned the truck for codes and not received a driver and /or passenger side mirror position sensor fault. Replacing the shift motor resolved many of the codes I had been chasing for a long time and not finding a fault. I wonder if the coil is also causing issues or maybe this was just an anomaly, we'll see.
 
OP
OP
whtbronco

whtbronco

Full Access Members
Joined
Nov 13, 2021
Posts
647
Reaction score
283
Location
Winchester, VA
I pulled apart the spare transfer case last night to get the coil and clutch patch out in preparation of repairing my transfer case next weekend. For the life me I cannot understand how the heck this coil/clutch assembly works.

The coil is basically an electromagnet. That means when we send electricity to energize it, it pulls. Okay so what part does it pull on. As I was typing this it finally hit me, I'm just slow. There's 2 different clutch plates and I think 5 or 6 of each. One type of clutch plate has teeth that engage the outer drum of the clutch assembly. The other type has teeth that engage the cam in the center. When released the clutch plates should have just enough space between them to slip past each other. When the coil is energized it pulls the clutches towards it. The only place the clutches can go is up against the hold armatures engaging both the outer drum and inner cam together.

What I couldn't get past in understanding this was that the clutches are separated from the coil by several thick pieces of metal so how does the coil magnetically attract the clutches, but I reckon it does. This is the only scenario that makes sense. From the coil is 7/8" of metal for the coil to attract through to get the first clutch, and the furthest clutch is another 1-1/4".

clutch pack plate 1/4" (aka hold armature, these are fairly thick and there's 2 pieces to this, 1 engages the outer drum 1/4" and another that engages the inner cam 7/16" just like the clutches do)
cam
cam/coil housing 3/16"
 

Latest posts

Forum statistics

Threads
54,530
Posts
509,206
Members
48,826
Latest member
JGExpedition
Top